DIY Cardboard Sniper Rifle: My Life-Size PSG-1 Build
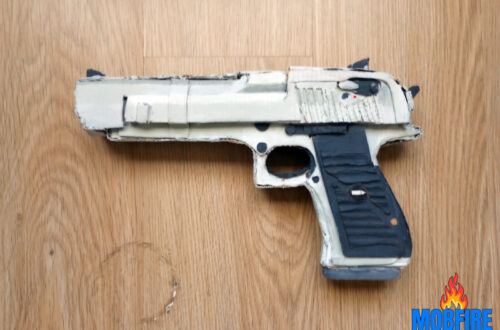
One of my favorite games is Grand Theft Auto IV, and one weapon that always stood out to me was the PSG-1 Combat Sniper Rifle. I loved its powerful sound and how it dominated compared to other snipers in the game. After spending so much time using it in-game, I knew I had to bring it to life. But instead of using plastic or metal, I took on the challenge of building a life-size cardboard sniper rifle—and making it look as close to the PSG-1 as possible. With layered cardboard, paint, and even a working LED scope, this DIY sniper rifle became one of my very first detailed cardboard weapon builds.
How I Made My DIY Cardboard Sniper Rifle (PSG-1)
Building the Base
To make my cardboard sniper rifle as realistic as possible, I started by studying reference images of the PSG-1 from Grand Theft Auto IV and real-life models. I constantly compared different angles, making sure I captured the right proportions. Using 2-4 boxes of cardboard, I cut out each part and carefully stacked the layers to build up the rifle’s thickness. This layering technique not only made the sniper feel sturdy but also helped replicate the gun’s unique shape. Every piece, from the stock to the barrel, was carefully transcribed and refined to match the real PSG-1 as closely as possible.
Painting My Cardboard PSG-1 for Realism
Once the shape was complete, I focused on painting the rifle to make it look as realistic as possible. I carefully matched the colors to the real PSG-1, using dark tones to give it that authentic, tactical look. To add even more detail, I used black construction paper in certain areas where paint alone wouldn’t create the right texture. This helped enhance different parts of the gun, making it look more polished and professional. The combination of layered cardboard, paint, and construction paper gave the cardboard sniper rifle a lifelike appearance, making it look less like a DIY project and more like a real weapon replica.
Adding an LED Scope

One of the coolest features of my cardboard sniper rifle is the working LED scope. Originally, I wanted to install a laser sight, but finding the right light was a challenge. Eventually, I found a random toy LED key ring and decided to adapt it for the build. Installing it was tricky since I’m not an engineer, but I managed to secure it inside the scope using glue and carefully placed reflections to make it look functional. Turning it on and off required some finesse—I had to use my nails to switch it, but in the end, it worked perfectly. This small addition made a huge difference, bringing the sniper rifle even closer to looking like the real PSG-1.
Clip & Barrel Challenges in My DIY Cardboard PSG-1

Designing the sniper clip was an interesting challenge. I wanted it to fit securely while still being removable, so I stacked cardboard squares to create a solid shape. To experiment with different styles, I even made a longer version of the clip. But the hardest part of the build was definitely the barrel—keeping it straight was a real struggle. The second-hand cardboard I used had a slight slant, which made the barrel lean no matter how carefully I glued it. Despite my best efforts, I was never able to fully attach it in a way that felt completely stable. Over time, the barrel became loose, and while I haven’t permanently reattached it, I used rolled-up black construction paper for the images in this blog to keep the look intact. Since this was one of my first builds, I see it as a learning experience, and I hope to recreate it in the future with better techniques. Maybe next time, I’ll even make a step-by-step tutorial to share everything I’ve learned along the way.
The End Result


Looking back on this build, I’m proud of how close it came to the real PSG-1 in terms of shape and details, especially for one of my very first detailed cardboard weapon builds. While the design itself was solid, there are definitely areas I would improve if I made another one. For example, the barrel could be sturdier, and I’d work on better attaching the pieces for a more secure finish. This project has taught me a lot about cardboard crafting and has definitely sharpened my skills. Every part of the process, from transcribing the shape to adding the final touches, has helped me understand what works and what doesn’t in creating realistic cardboard weapons. I’m excited to take what I’ve learned and apply it to my future builds.
This PSG-1 sniper rifle was an incredible project, but I’m just getting started. I can’t wait to show you what to build next.